donbot
Members
-
Joined
-
Last visited
Everything posted by donbot
-
17 Miranda Kerr 18 Clara Alonso 19 Irina Shayk 20 Behati Prinsloo 21 Emily DiDonato 22 Barbara Palvin 23 Marloes Horst 24 Julia Stegner
-
9
Natasha Barnard [6] Sara Sampaio [5]
^Oh cool, thanks!
Thanks gosia I thought UHQModels closed down last year though.. what's the link?
9 Natalia Vodianova 10 Karen Mulder 11 Katsia Damankova 12 Daniella Sarahyba 13 Candice Boucher 14 Josie Maran 15 Alyssa Miller 16 Milla Jovovich
Osmoze F/W 2012 Shoot by João Arraes AriLove @ tfs
More new Regina Also, new Ben Folds Five! Man is a beast on the piano
^Sad news indeed. So much respect and loving tributes paid to him over the past couple of days (Y)
Present (Group 1) Barbara Palvin [12] Josephine Skriver Darla Baker [8] Candice Boucher [7] Natasha Poly Milou Sluis Frida Gustavson [10] Present (Group 2) Cintia Dicker Coco Rocha [7] Edita Vilkeviciute [12] Ginta Lapina Erin Heatherton Terese Pagh Teglgaard [8] Katsia Zingarevich [10]
1 Cintia Dicker 2 Catrinel Menghia 3 Gracie Carvalho 4 Alejandra Alonso 5 Candice Swanepoel 6 Michelle Vawer 7 Edita Vilkeviciute 8 Kim Cloutier
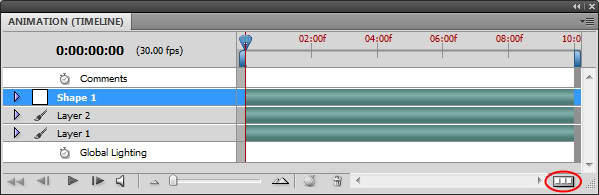
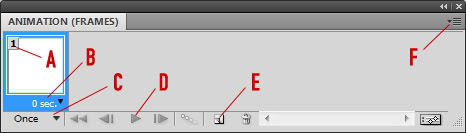
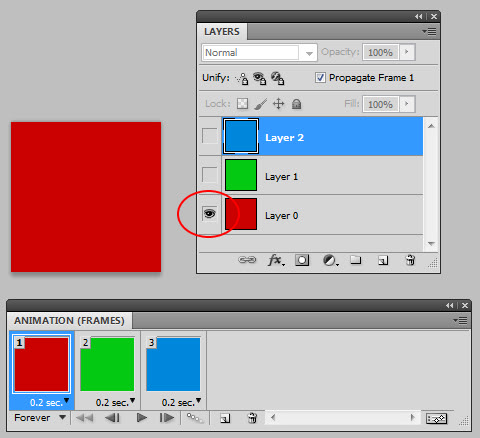
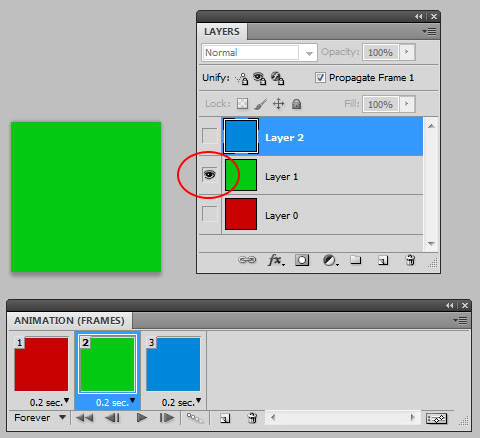
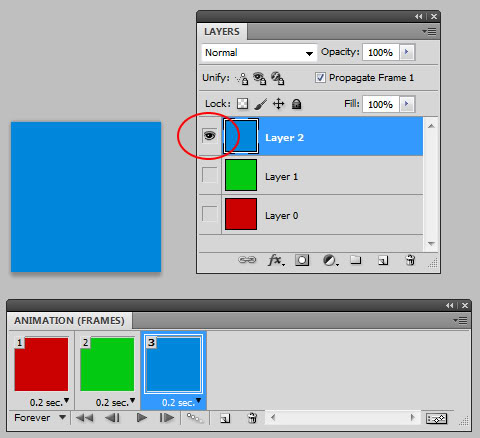
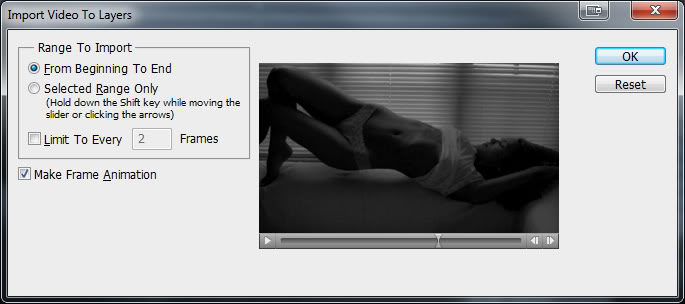
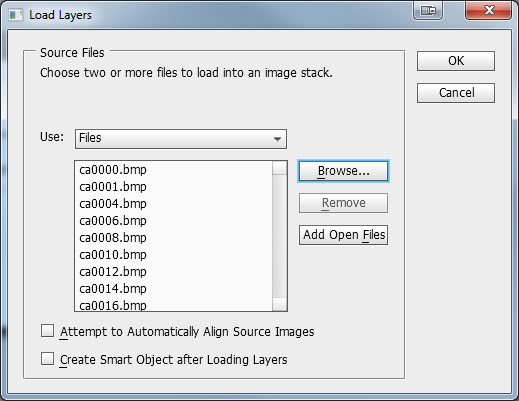
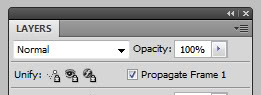
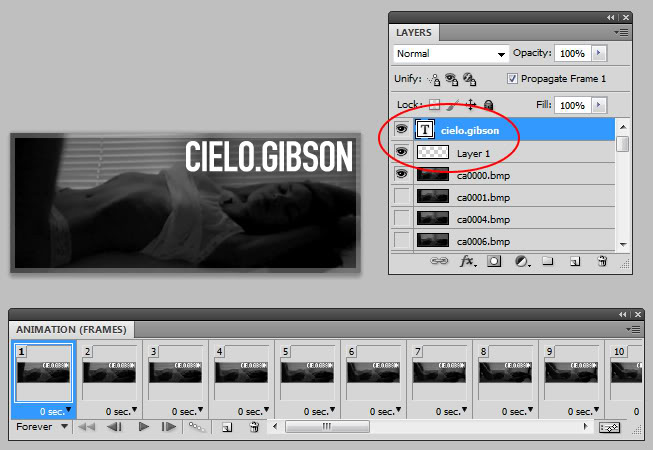
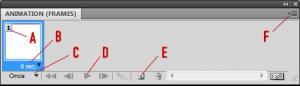
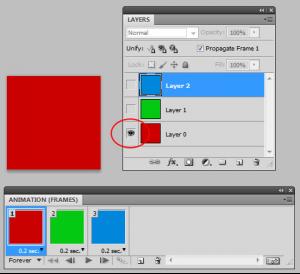
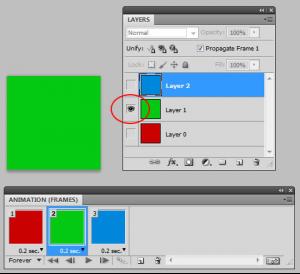
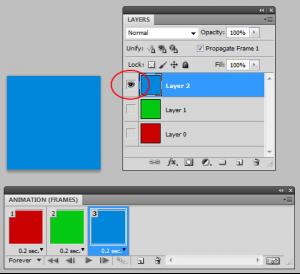
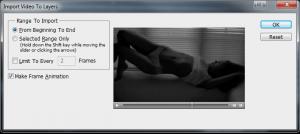
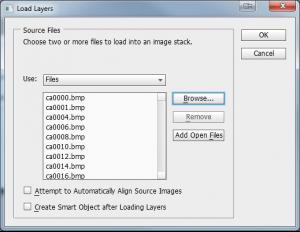
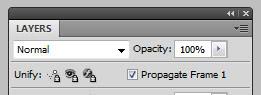
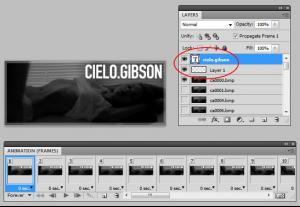
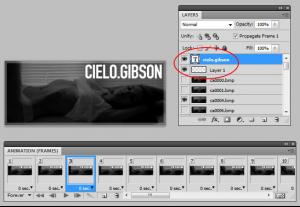
Hey LMS, I know you don't have Photoshop, so this probably won't help you, but kiki suggested I do a tutorial of sorts for this kind of thing anyway.. so maybe someone will find it useful I use Photoshop CS5, although not much has changed in the past few versions with respect to the functionality I'm about to explain. Prior to CS3 (I think?), Photoshop used to come with another piece of software which handled all of this, called ImageReady. Its features have now been merged into Photoshop though. Animation in Photoshop The animation palette The first thing to do is to open the Animation palette, which may not be visible by default. To do this, go to Window > Animation. If the palette looks like this, with "ANIMATION (TIMELINE)" as the heading, click the button in the bottom right (circled) to instead convert it to a frame animation. This is what it should look like, in a document that only has 1 frame: A: Frame number B: Frame delay (how many seconds this frame should be visible for) C: Looping options for the animation. You can make it repeat forever, or just make it play through a certain number of times then stop D: Play controls, to preview the animation as you're working on it E: Duplicate Frame button. This will duplicate the currently selected frame and insert it directly after F: Context menu. You'll find most of the other functionality you need in here Frames and layers The most important thing to know here is that for each frame of your animation, for the most part you're not actually manipulating the content of any layers - you're instead just changing which layers are visible at any one time. For example, in an animation like this: There is not just a single layer here which is changing colours each frame. Instead there are 3 layers - a red, a green and a blue. In Frame 1, only the red layer is visible and the other two are hidden: Similarly for Frames 2 and 3: Importing videos I generally don't do it this way, but you can import videos directly into Photoshop. 1. Go to File > Import > Video Frames to Layers 2. Browse to the video file. If you can't find it in the file browser, then it's probably an unsupported video format and you won't be able to import it directly 3. If you want to use the whole video leave "From Beginning to End" selected, otherwise choose "Selected Range Only" and select the portion of the video you want to keep 4. If the video preview is blank as you move the slider along, then the video format is not supported 5. Make sure "Make Frame Animation" is checked 6. Click OK Importing frames Rather than importing the video directly as explained above, I usually first crop out the frames in another program called VirtualDub. I just prefer it that way because of the precision and control, and the ability to select multiple ranges of frames. From there I export my frames as an image sequence, so I end up with a different image for each frame. Now to get these into Photoshop.. 1. Go to File > Scripts > Load Files into Stack 2. Browse to the images and select them all 3. Click OK and let the script run through, and you'll end up with the entire image sequence loaded into a Photoshop document, with each image in a different layer 4. In the Animation palette, go to the context menu and select Make Frames From Layers 5. Again from the context menu, select Reverse Frames Adding elements on top of a video animation Now that you have the video set up as a frame animation, you can easily add text or whatever you want on top. 1. Make sure you're working on Frame 1 2. In the Animation palette context menu, make sure "New Layers Visible in All Frames" is ticked 3. In the Layers palette, make sure "Propagate Frame 1" is ticked Now, anything you add on top will remain visible across the entire animation as the video plays underneath: Frame 1 Frame 3

 Back dimples
^That's not Shannan
Thanks all
Thanks a lot for all the recent pics Jenkinss!
Wonderful pics, thank you Danni & antoinetteda
Unbelievable Thanks gosia!
Back dimples
^That's not Shannan
Thanks all
Thanks a lot for all the recent pics Jenkinss!
Wonderful pics, thank you Danni & antoinetteda
Unbelievable Thanks gosia! Present - group 1 Valerie Van der Graaf [7] Alyssa Miller [8] Cora Keegan Knesia Kahnovich [10] Magdalena Frackoviak Stephanie Cherry Clara Alonso [12] Present - group 2 Doutzen Kroes [8] Bregje Heinen [7] Miranda Kerr Elsa Hosk Shanina Shaik [12] Hana Soukupova Nina Agdal [10]
1
17 Jeisa Chiminazzo 18 Behati Prinsloo 19 Olga Kurylenko 20 Emanuela De Paula 21 Bianca Balti 22 Isabeli Fontana 23 Michelle Vawer 24 Clara Alonso
Natasha Barnard [7] Lana Zakocela [3]
Present - group 1 Valerie Van der Graaf [7] Alyssa Miller [8] Cora Keegan Knesia Kahnovich [10] Magdalena Frackoviak Stephanie Cherry Clara Alonso [12] Present - group 2 Doutzen Kroes [8] Bregje Heinen [7] Miranda Kerr Elsa Hosk Shanina Shaik [12] Hana Soukupova Nina Agdal [10]
1
17 Jeisa Chiminazzo 18 Behati Prinsloo 19 Olga Kurylenko 20 Emanuela De Paula 21 Bianca Balti 22 Isabeli Fontana 23 Michelle Vawer 24 Clara Alonso
Natasha Barnard [7] Lana Zakocela [3]